
The Draw
The draw should be learned in steps; then combined into a seamless procedure. This skill is reinforced on the range with Pistol drill 3.
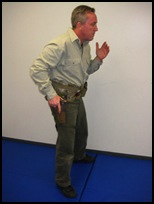
Ready Position:

This is the start position for any draw drill. You may use any natural stance with the hands away from the weapon. Ready is not the "gunslinger position," where the hand is hovering over the pistol as if you were in the wild west.
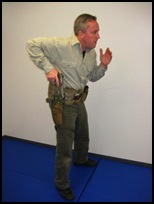
Position 1:
This is a transitional position. The firing hand moves to the pistol grip and all retention devices are disengaged. The grip is established here. Watch shooters for the following common mistakes in this phase of the draw:
With Safariland 6000 series holsters there are a tendency to "ride" the hood forward. This is an extra move and totally unnecessary.
Failure to establish a good grip is the second biggest problem in this phase of the draw. The Draw is an excellent skill to break into components. Simply establishing the grip and disengaging the holster retention over and over, will advance progress in the whole skill tremendously.
Position 2:
This is a transitional position. The shooter draws the gun straight up so that the triceps muscle is horizontal to the ground. The draw proceeds to position 3 by simply rotating the elbow towards the ground. A good high 2 position ensures that the weapon will be on a fairly level plane at position three. If done properly the shooter rarely "scoops" the pistol at the target.
When performing the "get off me drill" no new procedure or draw technique needs to be learned.
A high 2 position and dropping the elbow generally provides the proper body index to perform this type of emergency shooting.
Position 3:
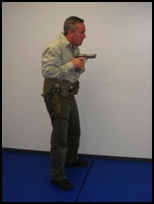
As stated above, from position 2, the elbow drops and the arm starts to extend toward the target. At this point the support hand is meeting up with the weapon. The gun is level and almost centerline of the body. Targets at close range can easily be engaged with body indexing or gross sight picture, if the situation calls for it. Otherwise, the arms begin to extend towards the target keeping the weapon level on its way to position 4.
Position 4:
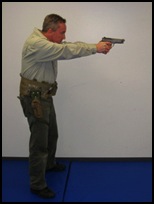
As the pistol transitions between 3 and 4, sight alignment and sight picture are established and slack is being removed from the trigger. At the full 4 position there should only be minor sight corrections and there should be relatively little distance left in the trigger.
Drills & Skills
Training
Don is a Retired Green Beret over at:

Rodney and Brian are Law Enforcement Officers over at:
If you're a writer and you need a reference page, check out TactQuill.com.

Sponsors
